Are you struggling with organizing a pantry with deep shelves?
Fear not, as i’ll provide you with the ultimate guide to organize your deep pantry, maintain order, and create an efficient pantry system. Follow these essential steps to transform your pantry into a well-organized and visually appealing space.

Step 1: Evaluate Your Pantry Needs and Space
Conduct a Pantry Audit
Start by taking a thorough inventory of your pantry items. Create a list of all the items, categorizing them by type (e.g., canned goods, spices, grains, etc.) and noting their expiration dates. This process will not only help you identify what you have, but also reveal any duplicate items, expired goods, or items you may have forgotten about.
Measure Your Pantry Space
Next, measure the dimensions of your pantry, including the height, width, and depth of each shelf. Be sure to account for any architectural features, such as molding or support beams, that may impact the usable space. Record these measurements as they will be crucial in selecting the right storage solutions and planning your pantry layout.
Assess Your Pantry Usage
Take a moment to reflect on your cooking and shopping habits. Which items do you use most frequently? Are there any items that you rarely use but still want to keep on hand? Understanding your pantry usage patterns will help you prioritize the placement of items and ensure that the most commonly used items are easily accessible.
Consider Your Pantry Goals
Lastly, think about what you hope to achieve by organizing your pantry with deep shelves. Do you want to create a visually appealing space, maximize storage capacity, or improve efficiency when cooking and shopping? Identifying your goals will guide your decisions when it comes to choosing storage solutions and arranging items in your pantry.
Step 2: Empty Your Pantry and Clean
A key component of deep pantry organization is starting with a clean and empty space. By removing all items and thoroughly cleaning your pantry, you set the stage for a successful organizing process. Here’s how to tackle deep pantries with this step while incorporating some organic products for a more eco-friendly approach:
Clear Out Your Pantry
Begin by removing all items from your deep pantry shelves. As you do this, take the opportunity to sort and group items by category, making note of any expired goods or duplicates. Set aside any non-perishable items that you no longer need or want, and consider donating them to a local food bank or charity.
Clean The Pantry
With your pantry empty, it’s time to clean every nook and cranny. Thoroughly clean the pantry floor by sweeping or vacuuming up any dust and crumbs.
This is my favorite cleaning product that can truly get rid of anything. It’s a miracle worker.
Step 3: Sort and Categorize Pantry Items
Effectively organizing deep pantry shelves requires a logical and efficient system for grouping items. By categorizing pantry items based on usage and similarity, you’ll create a functional and accessible storage system. Here’s how to sort and categorize your pantry items to optimize deep pantry storage:
Identify Common Categories
Start by identifying the most common categories of items found in your pantry. Some examples include:
- Baking supplies: Flour, sugar, baking powder, baking soda, etc.
- Canned goods: Soups, vegetables, fruits, beans, etc.
- Breakfast items: Cereal, oatmeal, granola, etc.
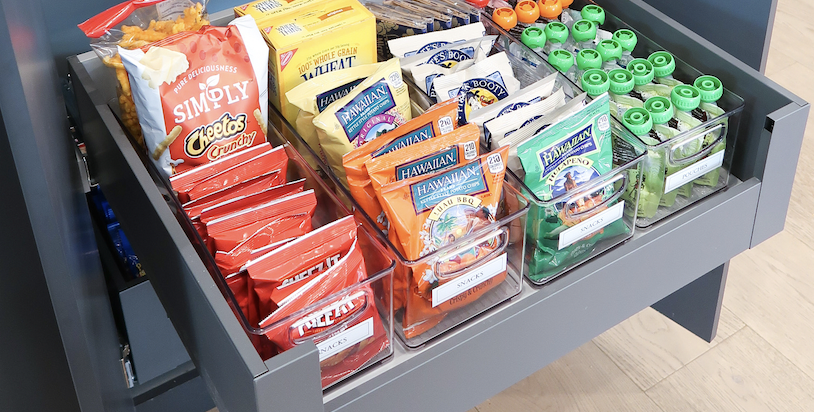
- Snacks: Chips, crackers, popcorn, nuts, etc.
- Cooking essentials: Oils, vinegars, condiments, spices, etc.
- Grains and pasta: Rice, quinoa, couscous, noodles, etc.
Create Custom Categories
In addition to the common categories, consider creating custom categories based on your own pantry needs and preferences. For example, you might create a category for:
- International cuisine: Ingredients for making your favorite international dishes.
- Health foods: Items like protein bars, superfoods, and supplements.
- Beverages: Tea, coffee, hot chocolate, and other drink mixes.
Sort Items by Category
Once you have established your categories, sort your pantry items accordingly. This process may involve reorganizing items that were previously stored together, but it will ultimately lead to a more efficient and accessible pantry system.
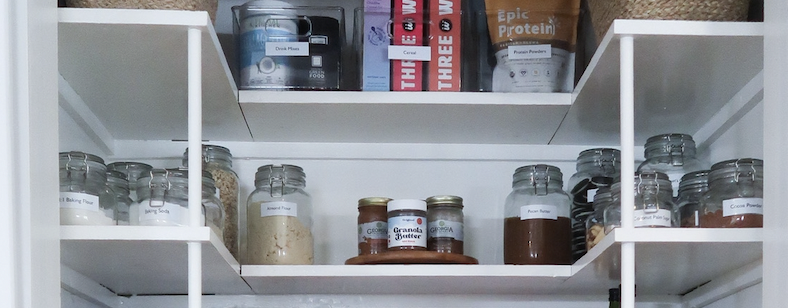
Use Consistent Labeling
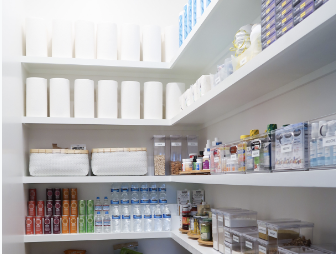
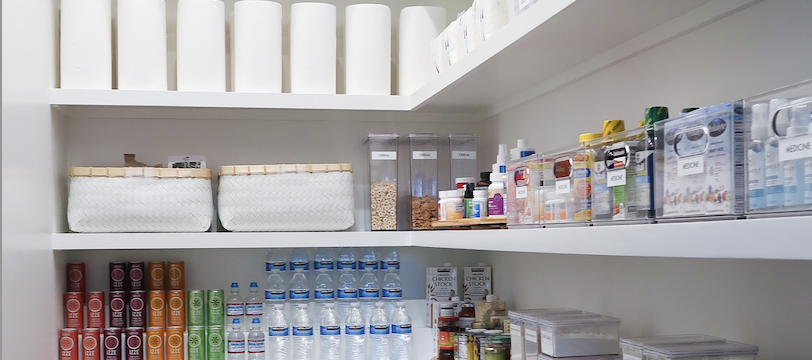
To maintain your deep pantry storage organization, create consistent labels for each category. This can be done using a label maker or by using a chalk marker on your storage containers or by labeling the designated areas on your shelves. Clear and consistent labeling and clear storage containers will help you quickly locate items and ensure that everything has its designated place in your pantry.
By organizing your pantry items into logical categories, you’ll optimize your deep pantry storage and make it easier to locate and access items when needed. With a well-organized pantry, you’ll save time and effort in your daily meal preparation and reduce the likelihood of purchasing duplicate items, ultimately contributing to a more efficient and enjoyable cooking experience in your own pantry.
Step 4: Select the Right Storage Solutions
Invest in high-quality storage solutions to make the most of your deep pantry shelves. And don’t forget, buy it right or buy it twice. Organizing products are high traffic items that need to stand the test of time and usage. Some options to consider include:
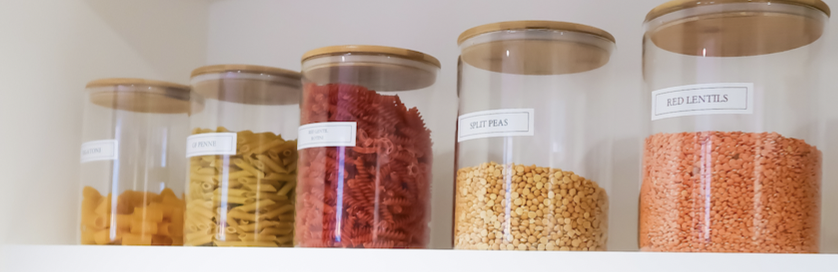
- Stackable clear containers: These allow you to see what’s inside and save space by stacking items vertically. These are my go-to’s that I use in every pantry project.
- Shelf dividers: Use these to create designated sections for different types of items.
- Lazy Susans: These rotating trays provide easy access to items at the back of deep shelves. Easily the most versatile product out there.
- Slide-out drawers: Install these to utilize the full depth of your pantry shelves and easily access items stored at the back. No more black hole cabinets.
Step 5: Arrange Items Strategically
A well-organized deep pantry involves strategic placement of items to ensure easy access, efficient use of space, and optimal storage conditions. Here are some in-depth details and practical tips for arranging items in your pantry:
Store Frequently Used Items at Eye Level
Make sure the items you use most often are positioned at eye level for easy access. I call this “prime real estate” in organizing. This will save you time and energy when preparing meals or searching for ingredients. Consider creating a designated “favorites” section at eye level to hold your most frequently used items.
Practical Tip: If you have a family with children, store kid-friendly snacks and items at a lower height, so they can easily access them without needing assistance.
Place Heavier Items on Lower Shelves and Lighter Items on Higher Shelves
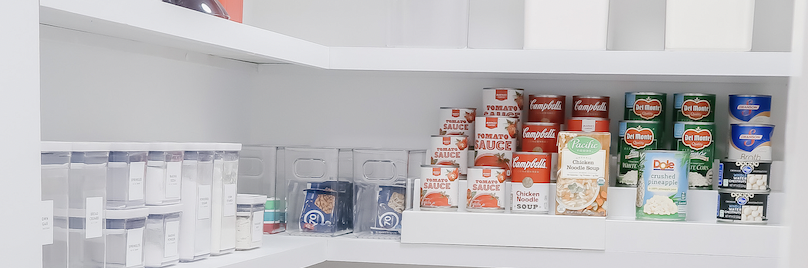
Store heavier items, such as canned goods, jars, or bulk containers, on lower shelves to prevent accidents and reduce strain when lifting. Conversely, place lighter items, like cereal boxes and paper goods, on higher shelves.
Practical Tip: To reduce the risk of items toppling over or being pushed to the top shelf or back of the pantry, use shelf dividers or clear bins to keep heavy items secure and organized.
Keep Similar Items Together in Designated Zones
Group items by category or purpose and designate specific zones for each group. This not only helps you find items quickly but also simplifies meal planning and grocery shopping.
Practical Tip: Use shelf labels or hanging tags to clearly mark each drawer unit or zone, making it easy for everyone in the household to maintain the organization system.
Utilize Vertical Space by Stacking Items and Using Shelf Risers
Deep pantry shelves often have ample vertical space that goes unused. Maximize this space by stacking items, either by hanging shelves directly on top of each other or by using stackable storage containers.
Practical Tip: Use shelf risers or tiered organizers to create additional levels within your pantry shelves, allowing you to store more items vertically without sacrificing visibility or accessibility.
Rotate Items Based on Expiration Dates
When placing items in your pantry, be mindful of their expiration dates. Position items with the soonest expiration dates toward the front, and those with later dates toward the back. This practice, known as stock rotation, helps prevent food waste by ensuring that items are used before they expire. Use a chalk marker to easily write expiration dates if you are decanting into jars.
Practical Tip: Periodically check expiration dates during your regular pantry maintenance routine to ensure that items are being used in a timely manner and to avoid unnecessary waste.
Step 6: Label Everything
Labeling is a crucial component of deep pantry organization, as it helps you quickly locate items, maintain order, and ensure that everyone in the household can adhere to the established system. This is a classic label maker that will stand the test of time. Here’s an in-depth look at the benefits of labeling, as well as some tips for creating an effective labeling system:
Benefits of Labeling
- Ease of Access: Labels make it simple to find specific items, eliminating the need to rummage through the pantry and potentially create disarray.
- Time Savings: By clearly indicating the location of each item, labels save time when preparing meals or searching for ingredients.
- Improved Maintenance: A well-labeled pantry is easier to maintain, as it allows for quick identification of items that need restocking or replacement.
- Consistent Organization: Labels ensure that everyone in the household can understand and follow the pantry organization system, contributing to a more orderly and efficient home.

Tips for Creating an Effective Labeling System
- Choose a Labeling Method: Select a method for creating your labels, such as using adhesive labels, a label maker, or even a chalk marker on reusable containers. Your chosen method should be durable, easy to read, and aesthetically pleasing.
- Use Consistent Fonts and Styles: Choose a font and style that is both legible and visually appealing. Maintain consistency throughout your pantry to create a cohesive look and make it easier to locate items.
- Include Important Information: In addition to the name of the item, consider including other pertinent details on the label, such as expiration dates, cooking instructions, or allergen information.
- Label Containers and Zones: Apply labels to both individual containers and designated zones on your pantry shelves. This will help maintain organization by ensuring that items are returned to their proper locations after use.
- Update Labels as Needed: Keep your labeling system up to date by replacing worn or outdated labels and creating new labels as you introduce new items or categories to your pantry.
Step 7: Establish a Pantry Maintenance Routine
To keep your pantry organized, establish a regular maintenance routine. This may include:
- Weekly inventory checks: Make sure items are in their designated zones and discard expired items.
- Monthly deep cleaning: Remove all items, clean shelves, and reorganize as needed.
- Seasonal updates: Adjust your pantry layout to accommodate seasonal items and changing needs.
By following these essential steps, you’ll create a well-organized, efficient, and visually appealing pantry with deep shelves that will serve you well for years to come. Remember, a well-organized pantry not only saves time and energy but also reduces waste and saves money in the long run. So, invest the time and effort now to create a pantry that works for you and your family.

Summary
How do you organize a super deep pantry?
To organize a super deep pantry, follow these steps:
- Evaluate your pantry needs and space, taking inventory of your items and assessing your storage requirements.
- Empty your pantry and clean it thoroughly.
- Categorize and group pantry items based on usage and similarity.
- Select appropriate storage solutions, such as clear bins, lazy susans, and shelf risers, to optimize space and accessibility.
- Arrange items strategically, keeping frequently used items at eye level and storing heavier items on lower shelves.
- Label everything, including containers and designated zones, for easy item location and maintenance.
- Maintain organization through regular checks and updates, ensuring that items are used before their expiration dates and that the pantry remains clutter-free.
What do you store in a deep pantry?
In a deep pantry, you can store various food items there, such as:
- Canned goods (vegetables, fruits, beans, soups, etc.)
- Baking supplies (flour, sugar, baking powder, etc.)
- Breakfast items (cereal, oatmeal, granola, etc.)
- Snacks (chips, crackers, nuts, etc.)
- Cooking essentials (oils, vinegars, condiments, spices, etc.)
- Grains and pasta (rice, quinoa, couscous, noodles, etc.)
- Beverages (tea, coffee, drink mixes, etc.)
- Bulk items (large bags of rice, beans, etc.)
- Paper goods (napkins, paper towels, etc.)
How do you organize a thin and deep pantry?
Organizing a thin and deep pantry involves maximizing vertical space and ensuring items are easily accessible. Here are some tips to organize deep pantry well:
- Use tiered shelf organizers or shelf risers to make use of vertical space and increase visibility.
- Install pull-out shelves or drawers to improve access to items stored deep within the pantry.
- Utilize door-mounted storage racks for additional storage space.
- Employ clear, stackable storage containers to maximize space and visibility.
- Store items in narrow, tall containers that make better use of the available space.
- Categorize and group items, arranging them strategically for easy access.
- Label everything for simple item location and pantry maintenance.
I hope this article was helpful. If you would like more curated tips feel free to reach out on this page.
And also, whether you’re looking to organize a pantry, pants or even your baby’s diapers – always remember to have fun!